No farmer, merchant, businessman or resident should be without the
convenience of telephone service. Farmers can keep in touch with packers and
shippers, customers with businessmen and merchants. It is available for
emergencies, and enables the ladies of the community to keep abreast of the
latest social news. The construction of your very own telephone line is not such
a complicated job requiring scientific skills. The construction and installation
of a telephone system has been made simple here. Just follow eight easy,
do-it-yourself steps.
Step 1: The first step is the decision to build the line and determine who is
going to pay for it. How many circuits will be necessary, and will the
construction be of the bracket or crossarm type? The bracket method should never
be used where there is a possibility of more than two wires ever being placed on
the pole. The approximate cost of a full metallic circuit, crossarm type:
Step 2: Now that the potential telephone tycoon has become enthusiastic about
his new adventure, the next step of routing of the line is necessary. One must
be aware of locating, obtaining right-of-way, staking out, grading land,
trimming trees and underbrush, railroad, highway and power line crossings,
selecting poles, framing poles, crossarming, stepping, setting, etc. Sounds like
work, doesn't it? Is the potential line builder sure he still wishes to go
through with it? Employ some linemen to help. Starting pay for linemen is
generally $1.00 per day with no climbing, and $2.00 with climbing. Starting from
the initial point, measure off the distance at which the poles are to be set.
Following a straight line as much as possible, locate a stake in the ground. The
builder will find that following roads and railroad tracks is not only more
convenient and practical but the crew is not so apt to become lost in the woods
while trying to find the shortest distance.
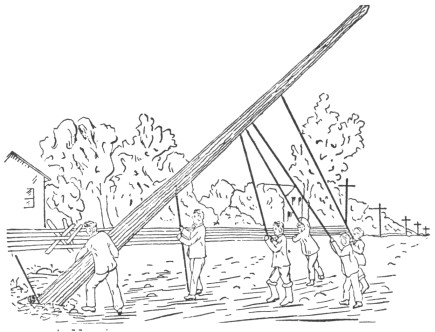
Step 3: Locate and select quality poles. Poles about 25 feet high should be
used on level stretches. The heaviest poles shall be placed on corners and
curves, and the best looking poles shall be placed in towns and in front of
residences. Poles allow the professional look to the job as well as being
practical; however, a tree and a beer bottle neck for an insulator has worked
fine for many lines However, if woods fires frequent the area, service can be
easily interrupted. It must be kept in mind that it usually takes eight or nine
men to plant a pole in the ground. Eight or ten poles are about as many as can
be set by the average gang in a day. All crossarms and braces shall, whenever
possible, be attached to poles before the poles are set. Poles shall be set in
concrete when sand is encountered, while all blasting of rock shall be in charge
of men experienced in the use of explosives.
Step 4: All pole hardware including glass insulators should be installed
next. Number 9 pony glass insulators should be used on rural lines. A locust or
oak pin, one inch in diameter fitted into a hole in the center of the crossarm
supports the glass insulator which is threaded to fit the pin
Step 5: Galvanized iron wire should be used in rural line construction Do not
do it the wrong way with fence wire stapled to trees. Static will be so bad, a
conversation will sound like a Fourth of July fireworks shoot. The line wire
should be carefully unwound along the line of the poles and drawn to the top of
each and tied to the insulators as shown in accompanying figure.
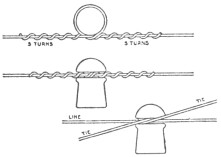
Step 6: To prevent interference from foreign currents and cross-talk between
circuits, the circuit must be transposed at about every quarter mile. The
accompanying figure indicates two satisfactory methods.
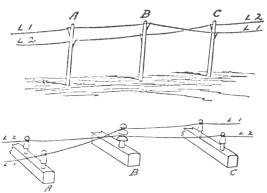
Step 7: Installing the instrument, The figure at the left indicates the
proper method for running drop wires. All instruments are to be grounded and
protected from lightning. Care should be taken when fastening the set to the
customer's wall. Before any holes are made, kindly confer with the lady of the
house for correct positioning. Do not allow customer to assist in the
installation of the telephone. Occasionally, patrons will want to try out your
new contraption for a few weeks, then have it removed before the bill is due.

Step 8: Rules of the line and servicing. Various suggestions should be given
to the patrons concerning service: Call by number only; treat operator
considerately; kind words improve service; answer all calls promptly; do not
call during a thunderstorm, as the company will not be liable for any injuries
received. In the event that there are several parties on one line, a distinct
ringing code must be given (1 long or 3 short rings, for example). All customers
on that line will know who is being called. (And, invariably, if they want to
know why, they will listen in.) When ringing, the caller will most likely hear
receivers coming up all along the line. Party line disputes will be common. A
charge of $2.00 per month is normal for telephone service.
Normal repair and maintenance on instruments and lines will be necessary.
Batteries in sets must be replaced periodically. Damage from storms and fires
may require a full time crew. Constant preventative maintenance will be required
of all equipment. Consult the rule book for bee or flea swarms or wild boar
encounters while in the field. However, run-ins with the natives (farmers with
shotguns) must be handled at the lineman's own discretion.

)
)
)
)